crochet blanket pattern
designed by terry day
FINISHED MEASUREMENTS
26 inches long x 37½ inches wide
MATERIALS
- Red Heart Super Saver medium (worsted) weight acrylic yarn
(7 oz/364 yds/198g per skein):
1 skein each #324 bright yellow, #312 black, #3 l l white, #336 warm brown, #624 tea leaf, #706 perfect pink
15 yds #365 coffee
2 yds #319 cherry red
- Red Heart Classic medium (worsted) weight acrylic yarn (3Yi oz/ 190 yds/l OOg per skein): 2 skeins #246 sea coral
- Sizes G/6/4mm and J/10/6mm crochet hooks or size needed to obtain gauge
- Yarn needle
GAUGE
Size J hook: Square= 11½ inches square; 8 hdc = 3 inches; 5 hdc rows = 2½ inches
PATTERN NOTES
Weave in loose ends as work progresses.
Chain-2 at beginning of row counts as first half double crochet unless otherwise stated.
Join with slip stitch as indicated unless otherwise stated.
BLANKET
Make 3 each tea leaf & sea coral.
Row 1 (RS): With size J hook, ch 46, hdc in 4th ch from hook, hdc in next ch, [sk next ch, hdc in each of next 2 chs] across to last 2 chs, sk next ch, hdc in last ch, turn. (30 hdc)
Row 2: Ch 2 (see Pattern Notes), hdc in sp between first 2 hdc, [sk next 2 hdc, 2 hdc in sp between this 2-hdc group and next 2-hdc group] across ending with 2 hdc in sp between last 2-hdc group and hdc at end of row, turn. (30 hdc)
Row 3: Ch 2, 2 hdc in sp between first 2 groups of 2-hdc, [2 hdc in sp between next 2 groups of 2-hdc] 13 times, hdc in turning ch, turn. (30 hdc)
Rows 4-25: [Rep rows 2 and 3 alternately] 11 times. Fasten off.
BUMBLEBEE
Make3.
Note: Use size G hook throughout Bumblebee.
Row 1: With bright yellow, ch 3, sc in 2nd ch from hook, sc in next ch, turn. (2 sc)
Row 2: Ch 1, 2 sc in each sc across, turn. ( 4 sc)
Row 3: Ch 1, 2 sc in first sc, sc in each of next 2 sc, 2 sc in last sc, turn. (6 sc)
Row 4: Ch 1, sc in each sc across, ending with 2 sc in last sc, change color (see Stitch Guide) to black, turn. (7 sc)
Row 5: Ch 1, sc in each sc across, 2 sc in last sc, turn. (8 sc)
Rows 6 & 7: Rep row 5. At the end of row 7, change color to bright yellow. (10 sc)
Row 8: Rep row 5. (11 sc)
Row 9: Ch 1, 2 sc in first sc, sc in each sc across to last sc, 2 sc in last sc, turn. (13 sc)
Row 10: Rep row 5. (14 sc)
Row 11: Ch 1, sc in each sc across, change color to black, turn.
Row 12: Ch 1, sc in each sc across, turn.
Rows 13 & 14: Rep row 12. At the end of row 14, change color to bright yellow.
Rows 15-17: Rep row 12.
Row 18: Ch 1, sc dec (see Stitch Guide) in next 2 sc, sc in each sc across to last 2 sc, sc dec in next 2 sc, change color to black, turn. (12 sc)
Row 19: Ch 1, sc dec in next 2 sc, sc in each sc across to last 2 sc, sc dec in next 2 sc, turn. (10 sc)
Row 20: Rep row 12, change color to bright yellow.
Row 21: Rep row 19. (8 sc) Rows 22 & 23: Rep row 12. Row 24: Rep row 19. (6 sc)
Row 25: Rep row 12.
Row 26: Rep row 19. Fasten off. (4 sc)
Antenna
Make6.
With black, ch 11. Fasten off.
Antenna Tip
Make6.
With perfect pink, ch 2, 6 sc in 2nd ch from hook, join (see Pattern Notes) in first sc. Fasten off.
Heart
Make3.
With perfect pink, ch 2, (hdc, ch 3, sl st, ch 2, hdc, ch 2, 3 sc) in 2nd sc from hook, join in 2nd ch of beg ch-2. Fasten off.
Wing
Make 12.
Rnd 1: With white, ch 8, sc in 2nd ch from hook, hdc in next ch, de in each of next 2 chs, tr in each of next 2 chs, 7 tr in last ch, working on opposite side of foundation ch, tr in each of next 2 chs, de in each of next 2 chs, hdc in next ch, sc in next ch, join in first sc. Fasten off.
BEEHIVE
Make3.
Note: Use size G hook throughout Beehive.
Bottom Piece
Rnd 1 (RS): With warm brown, ch 15, 2 de in 3rd ch from hook (sk chs count as first de), de in each ch across to last ch, 5 de in last ch, working on opposite side of foundation ch, de in each ch across, ending with 2 de in last ch, join in top of 15th ch. Fasten off (32 de)
2nd Piece
Rnd 1 (RS): With warm brown, ch 13, 2 de in 3rd ch from hook (sk chs count as first de), de in each ch across to last ch, 5 de in last ch, working on opposite side of foundation ch, de in each ch across, ending with 2 de in last ch, join in top of 15th ch. Fasten off (28 dc)
3rd Piece
Rnd 1 (RS): With warm brown, ch 9, 2 de in 3rd ch from hook (sk chs count as first de), de in each ch across to last ch, 5 de in last ch, working on opposite side of foundation ch, de in each ch across, ending with 2 de in last ch, join in top of 15th ch. Fasten off (20 de)
Top Piece
With warm brown, ch 7, 6 de in 4th ch from hook, sl st in first ch of beg ch-7. Fasten off.
Beehive Hole
Rnd 1 (RS): With coffee, ch 2, 13 hdc in 2nd ch from hook, join in first hdc, leaving a length of yarn, fasten off.
Note: Use yarn needle and matching yarn for assembling all parts of Blanket.
Beehive
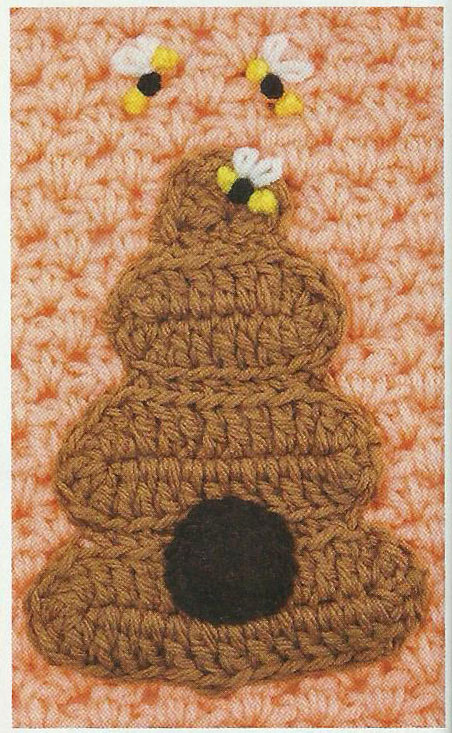
With RS facing and working in back lps (see Stitch Guide) only, whipstitch (see illustration) Bottom, 2nd, 3rd and Top Pieces of Beehive tog.

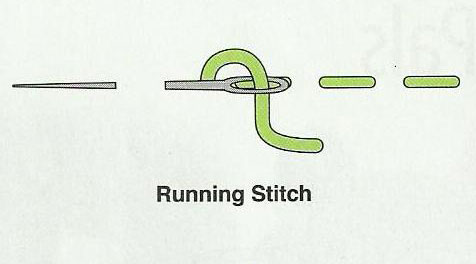
Center Beehive Hole on Beehive bottom edge even with foundation ch of Bottom Piece and attach it to Beehive using running stitch (see illustration).
Beehive Squares
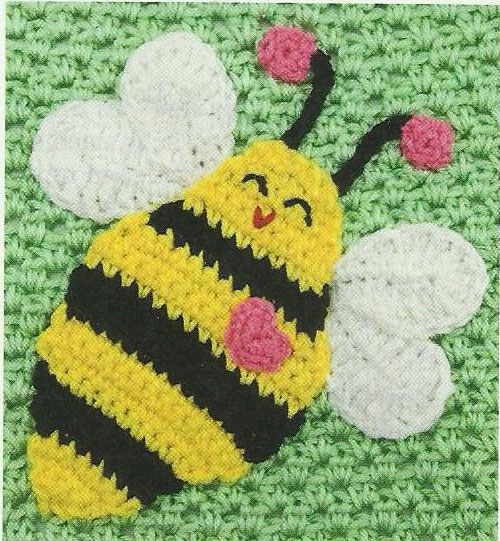
Sew Beehive to sea coral Square, centering from side to side, but placing it slightly lower than centered from top to bottom to allow for embroidery of mini bees as shown in photo. Use care that sts do not show on WS. Using photo on page 54 as a guide for placement, embroider mini bee body with 2 bright yellow French knots (see illustration) and black French knot between yellow French knots very close tog with a slight arch at center.

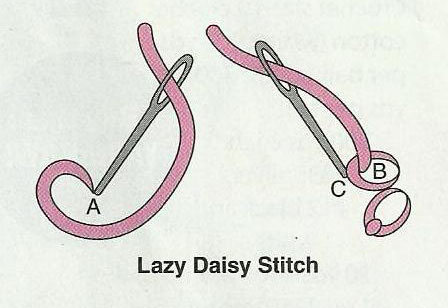
For mini bee wings, with white embroider 2 lazy daisy stitches (see illustration) on each mini bee.
Bumblebee Squares
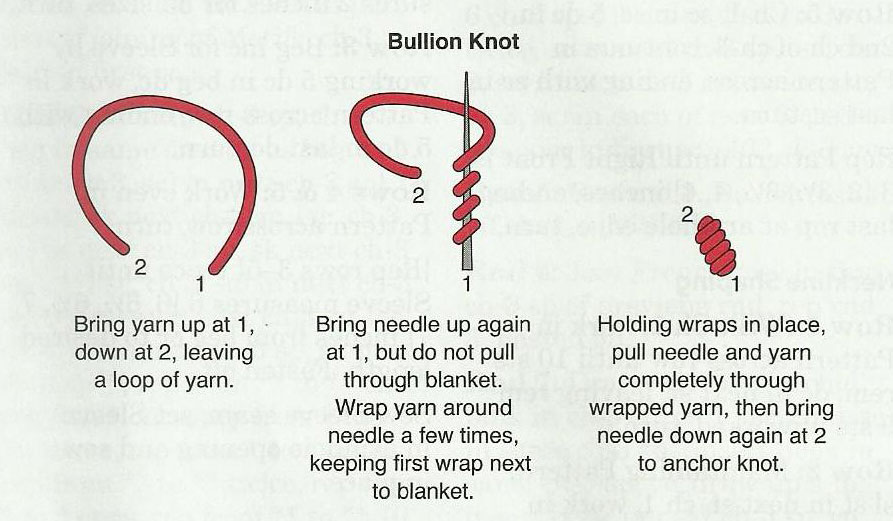
Sew a Heart to upper left side of Bumblebee body. Using photo as a guide, with black embroider eyes with bullion knot (see illustration) over row 24 and mouth with cherry red centered over rows 22 and 23 using short running stitches.
Center body on tea leaf Square with lower tip of body angled toward bottom left corner of Square.
Lay out Wings, Antennae (curving slightly) and Antenna Tips as in photo, tucking ends of Wings underneath body and Antennae underneath body and Antenna Tips. Make sure Bumblebee is centered once
all pieces are placed. Attach
all pieces to Square making sure that sts do not show on WS.
Rep with rem tea leaf Squares.
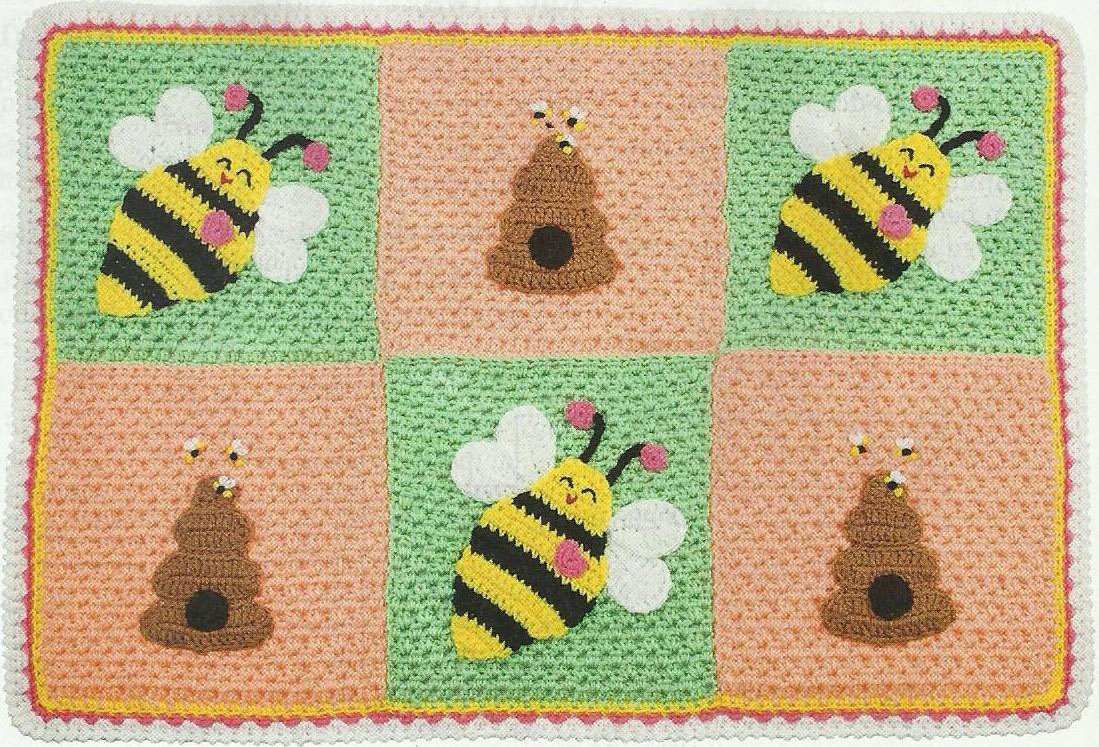
Blanket
Lay out Squares starting from left to right; first row: Bumblebee Square, Beehive Square and Bumblebee Square; 2nd row:
Beehive Square, Bumblebee Square and Beehive Square. Whipstitch Squares tog on WS.
BORDER
Rnd 1: With size G hook, join bright yellow with sc in corner of any corner square, 2 sc in same corner, sc evenly around outer edge, working 3 sc in each corner, join in beg sc. Fasten off.
Rnd 2: Working in back lps for this rnd only, join perfect pink with sc in back lp of center corner sc of rnd 1, 2 sc in same sc, sc in each sc around, working 3 sc in each corner, join in beg sc. Fasten off.
Rnd 3: Join white in center sc of corner, ch 2, 2 hdc in same corner st, [sk next sc, 2 hdc in next sc] around, working 3 hdc in each corner adjusting sts as necessary at corners, ending with, sk last sc, join in beg ch-2.
Rnd 4: Ch 1, reverse sc (see Stitch Guide) in each hdc around outer edge, join in first sc. Fasten off.
Press Blanket lightly with warm steam iron with double thickness of cloth between iron and blanket. Avoid pressing French knots of mini bees so as not to flatten them.